Try it! You'll like it! In several of my postings I've mentioned donating your valuable fossils to museums. I've also mentioned that museums can provide casts as replacements. The truth is that most museums and scientific institutions don't have the facilities for casting. As skilled personnel retire they are rarely replaced due to tightening budgets. So most casting is farmed out to a very few facilities. In return for casting items for other museums these facilities retain the molds, and the rights, to sell other casts. So the chance that you'll get a cast of large items is getting slim. It's simply a matter of money. A viable solution is that you learn how to do your own casting. Making casts of your favorite fossils will allow you to trade with other collectors and will make donations easier to swallow. I was recently asked to make a cast that would be used in an interactive museum display. They wanted school students to see fossils from crocodiles. I was given free reign for a design. The only stipulation was that it be strong enough to withstand hyperactive school children with small shovels. A tall order! The design, and construction, is outlined below. I hope it sparks a little interest in casting among some of the more adventurous collectors out there.
|
Location
| Berkeley County, South Carolina, USA |
| ID | 728 |
| Member | paleobum |
| Date Added | 12/14/2006 |
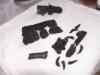 |
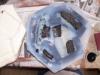
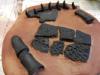
| Step one was to collect some crocodile fossils. Then I layed them out in the same position that I would cast them. I only use fossils that have been hardened. Never cast undardened fossils unless you wan't them in several pieces when you remove it from the mold. There are commercial demolding sprays that will prevent the mold silicon from sticking to your fossils. The problem is that some of them have silicon in them that will penetrate and stain your fossils. Never use commercial silicon penetr |
|
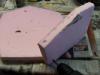 |
| Once I figure out the dimensions I'll need I make a box to hold the mold. I like to use foam insulation board that can be purchased at most home material stores. They come in sheets 4 feet by 8 feet. I like to use the 1 inch thick sheets because I can use sheet rock screws to put the box together. It easily cuts with a knife and makes a strong box. A popular brand is FOAMULAR. |
|
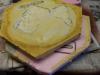 |
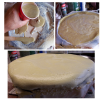
| After I make the retaining box I fill it with palster or hard foam. This will form the base that will hold the fossils. |
|
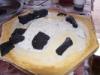 |
| I then place the fossils on the base and outline them with a marker. I then grind out the foam or plaster to a depth that will allow the fossils to be slightly below the surface. I then put the fossils in place and seal any gaps with modeling clay. This makes the fossils look like they are weathering out of the formation. |
|
 |
| The next step is to pour on a layer of the mold silicon. I use a special molding material that will stretch to 20 times it's original shape. It's expensive and is used for making animations that require a lot of continuous motion. There are a lot of molding materials available. The rule-of-thumb is that the more intricate the casting job, the more flexible the material needs to be. A too rigid material will require excessive cutting and increase the chance of breakage. |
|
 |
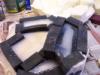
| I dip pieces of foam in my silicon and build up strength in areas that have high fossils. I don't want too thick of a layer of silicon. The thinner the better. But I have to have a rigid base when I cast later. So I build a second, thicker, base on top of the silicon. I use a flexible two part foam. It expands to 10 times it's original volume. It won't stick to the platinum based silicon and will easily pull away. It will also go back into place later during casting. |
|
 |
| Once the base foam is dry it easily pulls off. Then I carefully remove the original fossils. I'm now ready to cast. |
|
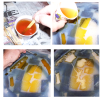 |
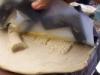
| I replace the foam base and then mix up some liquid plastic. I use a two part liquid plastic to fill in the deeper holes and then brush it all over the base of the mold. It only takes around 5 minutes to set up. This strong plastic will not break as easily as plaster and gives a thin, smooth layer that can be easily painted. |
|
 |
| After the plastic dries I add a two part hard foam to the entire base. This will expand about ten times it's volume and will adhere to the plastic. I add a fine ground plastic to the foam to give it strength and decrease the bubbles. It also makes it better to smoothly sand the foam once its cut down. |
|
 |
| Once the foam cures (20 min.) I turn the mold upside down and remove the flex foam base. |
|
 |
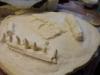
| I carefully remove the silicon mold. This cast has many tall, narrow teeth. Using strong plastic helps prevent them from breaking during demolding. |
|
 |
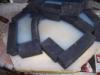
| This is the rough cast. I still need to trim off the excess foam on the sides. I use a hand saw to cut the bottom off flat. Light sandpaper will remove small irregularities. |
|
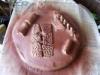 |
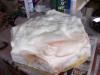
| The sides have been cut back and a base paint coating has been sprayed on. |
|
 |
| The last step is to paint the cast to match the color of the original fossils. Total time, including drying, was 8 hours. Five of those were waiting for the silicon to harden. I can now make new casts in as little as two hours each. |
|
|