Fossil Hunting Tools
Wouldn't it be nice if all you had to do to find awesome teeth is walk out the door and look down? I say no, because if the awesome ones were that common, no one would want them. Well, we do want them, and its hard work to find them. There are very few spots you can go where you can just walk around and pick up teeth. I do go to a few of these, but mostly I work hard for my teeth. Having the right tools is part of the hobby, so I thought I would show you what I use, just in case you are wondering how you, too, can find some nice teeth.
Land Collecting Tools
Shovels
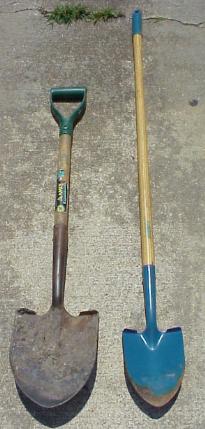
I would say the single most important tool I use to find fossils is the shovel. In case you didn't know, I dig up most of the teeth I find, and to do it, I need a good shovel. The shovel on the left is the one I use the most. Its short and has a handle so you can really put some power behind it when you slam a vertical wall with it. The shortness is cool because I kneel or sit when I dig to reduce back strain. The shovel on the right is a walking shovel. Its really just a glorified walking stick, but it comes in handy when you might be walking around looking for teeth and you run into a place that you could dig. I also should mention that a good pair of gloves goes hand in hand with a good shovel (forgive the pun). I have one final shovel that is not pictured as it is just an ordinary run of the mill garden shovel that I use when I sift. Make sure that digging is allowed where you hunt fossils! In some places, like the town of Summerville SC and on the Calvert Cliffs in Maryland, there are laws against it so a little research can keep you out of a lot of trouble.
Sifter
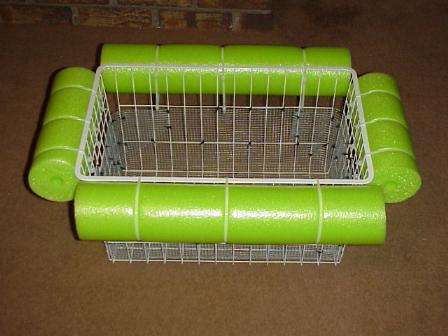
This is another really important tool in the fossil collector arsenal. There are countless streams and ditches that are too deep to surface collect, but undoubtedly have fossils in them, so you need to sift them out.
Here are Instructions to Build a Sifter for Fossil Hunting.
The Devastator
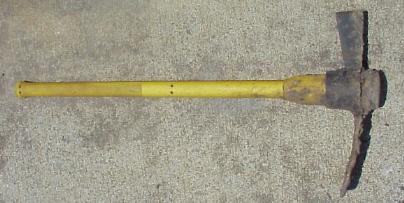
There comes a time in your digging life where you finally say to yourself - I need to move more dirt. Well, the devastator was the answer (the rest of the world calls them mattocks). With a couple of swings of this mighty tool, I can bring down hard banks to expose the fossil bearing layer underneath. As an added bonus, it comes with a sharp side for cutting away roots. Just a little info on these - they come in 3 flavors that I have seen. Wood handled, wood/fiberglass hybrid, and fiberglass. The first one of these I bought was a wooden one, and I bought it to take roots out of my way. I called it the root master. Ahh, the memories. Short story, it wasn't up to the cut. The handle broke within 2 weeks of purchase and I never did get any good use out of it. Usually wood is pretty good, I guess I just got a bum handle. Plus it only costs half as much as the fiberglass one. The hybrid costs somewhere in the middle, but I've never used one so I can't recommend either way. Anyway, I finally bought the fiberglass one, and I've been nothing but pleased. In fact, the one pictured was blessed on its first day in use. With it, my brother brought a 300 pound section of wall down containing a 6 1/2" complete, serrated, 1 1/2 pound megalodon. The downside to this tool is that its heavy. You don't want to carry this puppy too far. Now, a word of caution - never use this kind of tool directly in the layer! You will mangle any fossils there beyond recognition. Also, as with the shovels, make sure digging is allowed where you are going to hunt fossils. As was so wisely stated in Spiderman, "With great power comes great responsibility."
Extreme Toothin
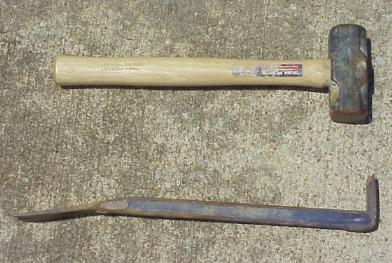
What you see here is a sledge hammer and a 17" prying bar. How could this possibly be used for hunting teeth? Well, here's how it works. Lets say you have a vertical wall with a nice layer right in the middle. The top layers, including the layers, have been baking in the sun for days or weeks even and are now literally as hard as concrete. The sediments below the layer are always soft (where I hunt anyway) because they are made up entirely of fine sand. If they havent been removed yet, you take them out with your shovel. What you are left with is an overhang with the layer right on bottom. You insert the prying bar about 2 inches above the fossil layer and begin sledging it into the wall as hard as you can. Soon, all that will be exposed is the hammering surface. (on this kind of bar, there is a 90 degree bend with two hammering surfaces.) You then direct your force downward. Eventually, the layer will fall and you pick through it with your hands. And because you left a 2" buffer between the layer and where you inserted the bar, all the teeth are undamaged by the process. Its really a brilliant idea. I wish I had thought of it. It was actually my brother's idea. Another application of the same principal involves breaking apart sections of collapsed wall sections that contain fossils.
Probe
I wish I could always hunt in new areas, but I can't, so sometimes I have to hunt in old, overgrown ditch banks and creeks. You can't see the layer so how do you find it? With a probe. You poke this bad boy down into the dirt until you feel rocks. Then you just dig off the overburden and harvest the teeth. This is also a valuable tool if you're sifting an area that is really sandy. Gravel deposits are often found under sand, and this is much easier than digging away sand to see what's there.
Machete
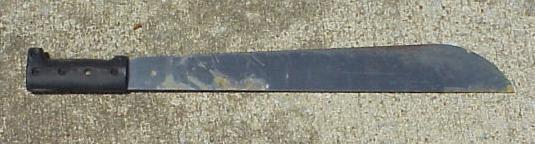
Let's say you are probing and you find some really nice layer, but there are little vines and cruddy roots all over the place that you can't get your shovel in. Voila! the machete takes out all that garbage with much greater precision that the devastator. The machete is also handy for clearing out ground clutter before you dig, and vines and sticker bushes en route to your destination.
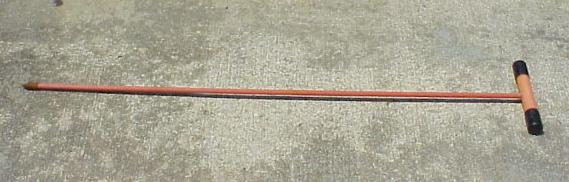
Fork

This is a tool used solely for walking to find teeth. Its a great walking stick, and it makes it easy to flip over potential finds. Plus, you can't beat it when you're climbing up steep ditch banks. You just slam this thing into the ground and pull yourself up with it. The downside is that you can't really dig with it except in sand, so if I think I'll have to do any digging, I take the walking shovel instead.
Rock Hammer

This is a good one to have if you do any collecting in quarries. If you do, then you know that fossils are often found in limestone or other extremely hard sediments. You don't want to carry a 2 ton rock back to the truck for one little cow shark tooth, do you? Just bust it out with this and be on your way. I always wear safety goggles when using this tool.
Chisel
I use the masonry chisel in conjunction with the hammer side of the rock hammer to more precisely break fossils out of the matrix. Notice the hand guard on this tool - a MUST HAVE! It would suck to bash yourself in the hand and cut a perfectly good toothin day short. As with the rock hammer, I always wear safety goggles when I use this tool.
Scuba Diving Tools
The POS

The easiest way to enjoy river diving is with a boat, so I sold some stuff and came up with the loot to score a vessel. Its ugly, and it leaks, but it does the job. With the 6 hp motor, though, I can cut a 4 hour paddling trip to 40 minutes. Click the picture to see the christening ceremony. Its an experience you'll want to share.
Mask
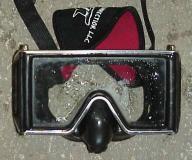
Here's the most obvious thing you need to dive. Without a mask, you can't see, so you better bring a good one. The big thick strap on the back is a replacement for the one the mask originally came with. Its called a slap strap and in my opinion, its a must have. It makes it easier to put on and pull off because it doesn't pull your hair like a normal strap, and it is also positively bouyant, so if you lose your mask for some reason, it could help it float to the surface.
Fins
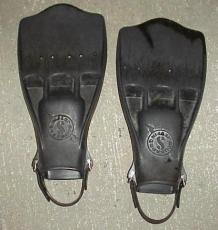
Fins are nice to have because you can't fight the current without them. They also make you look bigger in the water to gators :-) I don't know if that matters or not, but it sounds cool, right?
Gloves
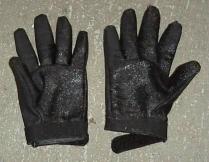
These aren't so obvious, but you need them. There is broken glass all over the bottom of the rivers, and its easy to cut your hand without it. A bad cut in these nasty rivers would NOT be good.
Weight Belt
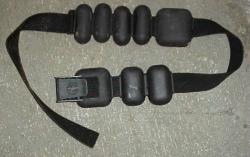
You need lots of lead to help you sink to the bottom of the river and to make you heavier so you can fight the current easier. You need a lot more than you would normally wear in salt water. I wear anywhere from 30 to 60 pounds, depending on current.
Lights
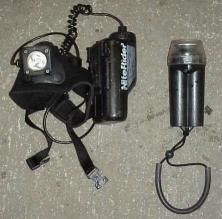
When the water is clear (no sediment suspended), the sunlight can make it down about 10 feet before it is completely blocked out by the tannic acid water. Seriously - Its like swimming in tea. You need a BRIGHT light to help you see the teeth on the bottom. The light on the left is a head mounted light; its my main light. Head lights are great because they leave your hands free for other tasks. Believe me, there are a lot! The light on the right is a regular hand light that I use for a back-up. ALWAYS take a back-up so if your main goes out, your dive isn't ruined.
Goodybag

You gotta have something to keep all the 6 inch megs in, don't ya? Mine has seen better days, but it still works great. Its all tannic acid stained like the water. Cool, huh? I like the bags with the wire opener because the can open really big and are easy to clip to you when ascending and descending.
Kneepads
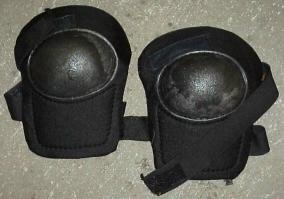
You don't have to have these, but they will really extend the life of your wetsuit. You spend a lot of time on your knees down there, and there are jagged rocks all over the place. Jagged rocks are murder on wetsuits.
Rake / Screwdriver
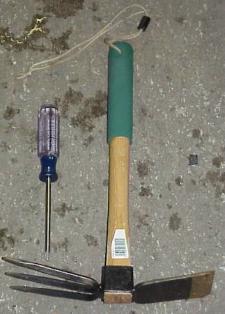
One of these is essential! You have to have something to stab into the bottom of the river to hold yourself in place against the current. For that purpose, the screwdriver is the best. But sometimes, its nice to have something to dig with down there. In that case, the rake is cool. You can also use it to hold yourself in place, but its not as easy because its tougher to get three prongs into the marl. Another purpose of these tools is to mark lines where you have been on the featureless marl bottom.
Regulator
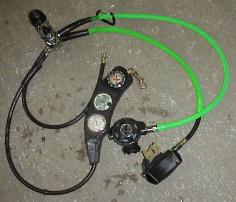
Here's another indispensable piece of equipment for diving. You breathe through this, so don't cheap out when buying one. If you get a used one, have a reputable dive shop check it out. This rig is also called an octopus - notice the dual first stages (the part you breathe through). There is a spare just in case. Then there is a console where all my guages are. I have a compass to help me navigate, a pressure guage to tell me how much air I have left, and I have a computer that does all kinds of neat stuff like figure depth, decompression time, maximum bottom time, etc. Computers aren't required but they are nice to have.
Coveralls
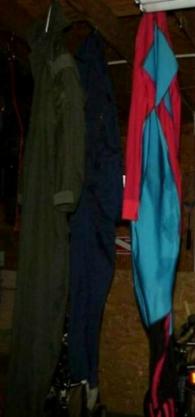
The water temperature around here is normally pretty warm, so I normally don't dive with a wetsuit. Coveralls help to protect you from annoying little biting minnows, crabs, accidental scrapes with boulders, etc. When it gets cold, though, you gotta wear a wetsuit in place of the coveralls.
Booties
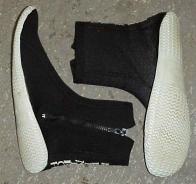
The only thing these do is make you look cool to chicks under water. Naw - just kidding. They protect your feet from your fins which can cause nasty blisters. These also keep your feet warm when the water is cold.
BCD
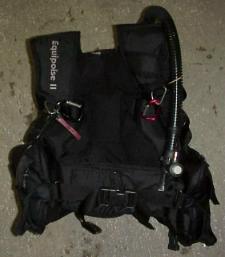
Your BCD (Buoyancy Compensator Device) is where most of your diving cash is spent. This thing has pockets for misc. stuff you might find or need, rings to hook clips onto (you hook all your handheld stuff to the clips), and it fills with air from your tank to take you back to the surface when you're ready to come up. You can get a BCD used, but you need to be sure the bladder on the inside doesn't have any holes in it before you buy it.
Bag
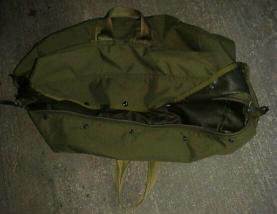
You need something to stow all your junk in so you don't trip over it in the boat.
Tanks
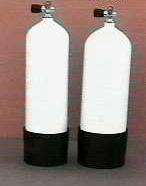
I used to rent tanks all the time because of all the upkeep, but I got sick of making two trips to the dive shop after each dive so I broke down and bought some. Mine cost $200 each but that was several years ago so they are probably more now. Once a year, you have to get a visual inspection on each tank before any dive shop will fill them for you. That costs money. Then, once every 5 years you have to get a hydrostatic test before any dive shop will fill your tanks. That costs.